Angie
Overview
In this guide we will be using Angie as a reverse proxy to access the Aura panel. We will point a domain name to our server and configure Angie.
You need to have a registered domain name to continue.
Point domain to your server
Check your server's IP address. It is better to use a static IPv4 address.
Now, you need to point your domain name to this IP address.
For example, it will be my-super-panel.com -> 193.122.122.122.
There are two ways to do this:
- Use a DNS provider (e.g. Cloudflare, Google Cloud, etc.)
- Use a registrar (e.g. Namecheap, etc.)
DNS provider
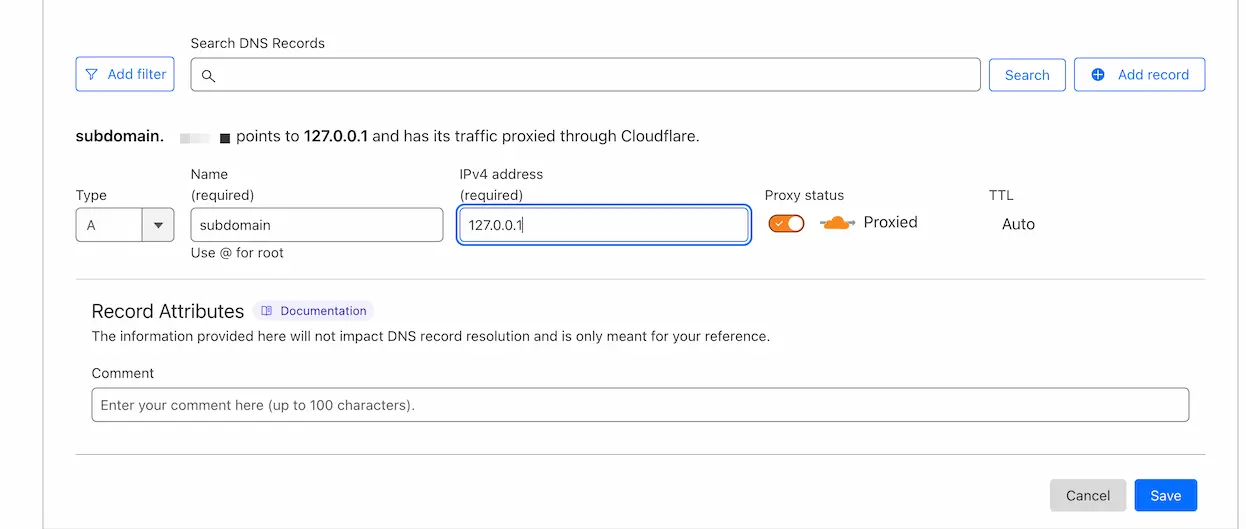
If you are using Cloudflare, you need to add a A/AAAA record (for IPv4 and IPv6 respectively) to your DNS records.
Log in to your Cloudflare account here and select the desired domain.
On the left side of the page, click on DNS and then click on Records. Click on Create record.
Set the Type to A and the Name to @.
If you want to use subdomains, you should enter the subdomain name (e.g. panel) in the Name field.
Enter your server's IP address in the IPv4 address field. and click on Save.
Now you need to wait a while for the DNS records to be updated.
There is a big difference between yellow cloud (domain is proxied by Cloudflare) and grey cloud (domain is not proxied by Cloudflare) in the Cloudflare control panel.
If Cloudflare works fine in your region, it is better to proxy the domain through Cloudflare. (Yellow cloud)
Some DNS providers have a different interface, but the overall process is the same.
Create a folder for Angie
mkdir -p /opt/aura/angie && cd /opt/aura/angie
Angie configuration
Simple configuration
Create a file called angie.conf in the /opt/aura/angie directory.
cd /opt/aura/angie && nano angie.conf
Paste the following configuration.
Please, replace REPLACE_WITH_YOUR_DOMAIN with your domain name.
Review the configuration below, look for red highlighted lines.
upstream aura-backend {
    server aura-backend:3000;
}

# Connection header for WebSocket reverse proxy
map $http_upgrade $connection_upgrade {
    default upgrade;
    "" close;
}

resolver 1.1.1.1 1.0.0.1 8.8.8.8 8.8.4.4 208.67.222.222 208.67.220.220;

acme_client acme_le https://acme-v02.api.letsencrypt.org/directory;

server {
    server_name REPLACE_WITH_YOUR_DOMAIN;

    listen 443 ssl reuseport;
    listen [::]:443 ssl reuseport;
    http2 on;

    acme acme_le;

    # SSL Configuration (Mozilla Intermediate)
    ssl_protocols TLSv1.2 TLSv1.3;
    ssl_ciphers ECDHE-ECDSA-AES128-GCM-SHA256:ECDHE-RSA-AES128-GCM-SHA256:ECDHE-ECDSA-AES256-GCM-SHA384:ECDHE-RSA-AES256-GCM-SHA384:ECDHE-ECDSA-CHACHA20-POLY1305:ECDHE-RSA-CHACHA20-POLY1305:DHE-RSA-AES128-GCM-SHA256:DHE-RSA-AES256-GCM-SHA384:DHE-RSA-CHACHA20-POLY1305;
    ssl_session_timeout 1d;
    ssl_session_cache shared:SSL:1m;
    ssl_session_tickets off;
    ssl_certificate $acme_cert_acme_le;
    ssl_certificate_key $acme_cert_key_acme_le;

    location / {
        proxy_http_version 1.1;
        proxy_pass http://remnawave;
        proxy_set_header Host $host;
        proxy_set_header Upgrade $http_upgrade;
        proxy_set_header Connection $connection_upgrade;
        proxy_set_header X-Real-IP $remote_addr;
        proxy_set_header X-Forwarded-For $proxy_add_x_forwarded_for;
        proxy_set_header X-Forwarded-Proto $scheme;
    }

    # Gzip Compression
    gzip on;
    gzip_vary on;
    gzip_proxied any;
    gzip_comp_level 6;
    gzip_buffers 16 8k;
    gzip_http_version 1.1;
    gzip_min_length 256;
    gzip_types
        application/atom+xml
        application/geo+json
        application/javascript
        application/x-javascript
        application/json
        application/ld+json
        application/manifest+json
        application/rdf+xml
        application/rss+xml
        application/xhtml+xml
        application/xml
        font/eot
        font/otf
        font/ttf
        image/svg+xml
        text/css
        text/javascript
        text/plain
        text/xml;
}

server {
    listen 443 ssl default_server;
    listen [::]:443 ssl default_server;
    server_name _;

    ssl_reject_handshake on;
}

server {
    listen 80;
    return 444; # https://angie.software/angie/docs/configuration/acme/#http
}
Create docker-compose.yml
Create a docker-compose.yml file in the /opt/aura/angie directory.
cd /opt/aura/angie && nano docker-compose.yml
Paste the following configuration.
services:
    remnawave-angie:
        image: docker.angie.software/angie:1.9.0
        container_name: remnawave-angie
        hostname: remnawave-angie
        restart: always
        ports:
            - '0.0.0.0:443:443'
            - '0.0.0.0:80:80'
        networks:
            - aura-network
        volumes:
            - angie-ssl-data:/var/lib/angie/acme/
            - ./angie.conf:/etc/angie/http.d/default.conf:ro

networks:
    aura-network:
        name: aura-network
        driver: bridge
        external: true

volumes:
    angie-ssl-data:
        driver: local
        external: false
        name: angie-ssl-data
Start the container
docker compose up -d && docker compose logs -f -t
Open the panel in the browser
Open the configured domain name in the browser and you will see the login page.